A Jedi and an iPhone

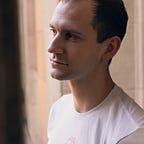
This picture was taken on my two-year-old iPhone 6s Plus in the dimly-lit basement of the El Capitan theater in Hollywood after watching The Last Jedi.
The theater has a cool display with costumes from the movie and some behind-the-scenes images. They also had this backdrop that looks like the interior of a First Order ship. Naturally, I took a few casual pictures of my girlfriend, Alejandra, thinking they might be fun to post on social with just a filter.
But of course, once I pulled this one into Photoshop, I had to see what I could do.
The starting point

As you can see, problems abound with this shot. Color balance is way off, it’s pretty dark, no good lighting on her face, no real sharpness to speak of, and there’s a lot of noise because of the dim lighting.
(To be honest, at this point, I wasn’t expecting to be able to do much with this picture)
This isn’t going to be an exhaustive tutorial or anything, but let’s go through a quick rundown of what I did to take this photo from basic iPhone picture to epic Jedi image.
The process

I’ve built up a pretty standard process for my photography retouching over the last few years, and this photo followed the same steps that I usually use—it just ended up taking a lot more time and care.
My basic process is as follows:
- My first step is to use frequency separation to smooth out skin and achieve a clean, editorial look.
- I then use a combination of curves and masking to paint in some contrast on the eyes. This really makes the subject’s eyes stand out and draws the viewer in. Eyes really matter, so this makes a huge difference.
- For sharpening, I create a stamp visible layer, desaturate it, then use a high pass filter (I use a 4px radius) and set the blending mode to overlay. As a second step, I duplicate this layer and hide it with a mask, then use the brush tool to make the layer visible only on key elements, such as the eyes, nose, and mouth. Again, this helps to draw the viewer into the focal point of the image.
- Add a lightsaber to the image (okay, this isn’t part of my standard process). I was debating on whether to add a lightsaber to this one or not, but I figured that when you get the chance to make photo with a lightsaber, you might as well add a lightsaber. Also, key lightsaber-compositing tip: make sure you paint in a reflection of the blade on the subject’s eyes!
- Next: color. I usually pull up the blacks to give a film-like look, add a little contrast, and generally play around with curves layers until I’ve got the color grade I want. In this case I also lowered the saturation a bit. There are no real fancy tricks here, it’s just about knowing what kind of look you’re going for and adjusting levels until you’ve got it where you want it.
- Lastly, add a quick vignette to the image. I do this by creating a curves layer and pulling the overall brightness down a bit, then inverting the mask so that it’s invisible. I take a reverse gradient, drag out from the focal point of the image to the edge, and voila! We have ourselves a custom, subtle vignette that doesn’t stand out, but does pull the viewer into what you want them to see in the image.
Notice that I have three separate steps dedicated to directing the viewer’s attention and enhancing that part of the image. It’s really that important, and it makes your photography stand out.
This isn’t the highest quality photo I’ve ever made, but it was a blast to start with a rough, plain image and see if I really could take it into a galaxy far, far away. I’m quite happy with the result!
I hope you enjoyed the photo and this rundown. Until next time: may the force be with you.
Follow me on Instagram for more photography!